Your Coordinator Dashboard will greet you first thing upon login, offering a clear overview of your tasks and tools.
Coordinator Dashboard is your Homepage and is what you will see every time you log in to your account as a Coordinator.
You can see the notification icons on the left-hand side, a group of administration buttons on the right-hand side, and all the active classes within your school listed vertically in the middle of the screen.

Rolling down the page, you will see more information regarding the Trainer Summary and Print Order Summary sections.

- The notification icons
- Administration buttons
- Class Index
- Trainer Summary
- Print Order
- IVET Knowledge Base
Let's discover each of the sessions, starting with the notification icons:
1. The notification icons: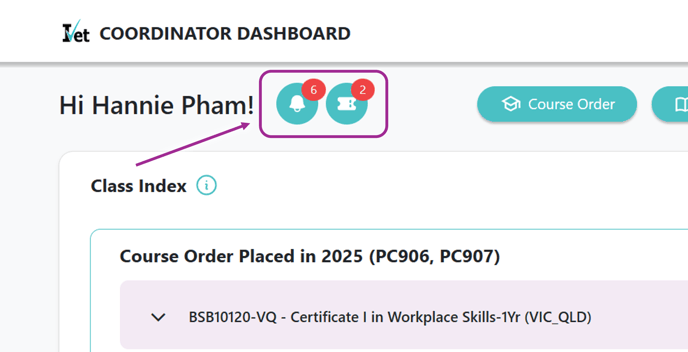
- Bell icon: shows a summary of all issues relating to Trainer Compliance, School TFEC (Trainer Facilities and Equipment Checklists), Students USIs, and Student Enrolments that need to be checked across all the current classes.

- Trainer Compliance Forms: Keeps you updated about all the Trainers' compliance statuses within you school.
- School TFEC (Facilities and Equipment): Informs you of the school's TFEC (Facilities and Equipment) status
- Student USIs (Unique Student Identifier): Student USI issues will be shown in class level. To see further details, you may click on the Manage students button, it will then bring you to the Class Management page.
- Student Enrolments: If the Students have not started their enrolments 3 days after being invited to the class, the system will also notify you about those in this area.
- School change request icon: show a summary of Student and Trainer changes requests statuses and details across all the current classes within your school. Simply click on View Details to see further information.

You can also click on Add Request or Cancel to actually add or cancel a change request, more details are shown in these articles:
2. Administration buttons:
In the upper right corner, you can see the buttons. Please click on the links to better understand the features of each button:

f) Add Classes
g) Administrate Classes
g1) How to Amend Student Enrolments
g2) How to Change, Add or Remove Trainers
Trainer Dashboard button only appears when Coordinator having Dual Coordinator & Trainer Role.
3. Class Index:
Class index shows all the active classes within your school.
- Color Code: you can hover your mouse over the information icon to see the description.

- The classes in purple are classes that have outstanding items that need to be checked.
- The classes in blue are currently active.
- The classes in grey are hidden.
- Levels: Classes are displayed in the following levels:

- Course Order level: course order per year will be listed from newest to oldest, showing all the parent course included.
- Parent Course level: Simply click on the arrow to view all the classes included in the parent course, you can also see the start date, end date and the status of the parent course at the right-side of the tab.
-
- Class level:

- On the left-side of the tab, you can find all the class information (class name, class ID, class start date & end date)
- On the right-side of the tab, you may see some icons & buttons:
- Edit class button: allows you to view class details and edit class name
- Notification button: notifies you about the Trainer Forms & Student USI status within the class
- School Change Request: shows the change request status related to the class
- Assessments to be marked: flag the number of assessments that need to be marked within the class
- Go to Class button: brings you to the Class Management page
- Click on the arrow and you can see some further information about the class such as the course name, the Trainers, the class status, the number of Students and the number of assessments to be marked
- Class level:
- Sometimes you will see some separate classes at the bottom of the Class index session, they are classes that do not belong to any course order.
- Search & Filter:

- If you have too many classes, the Portal allows you to search for the class you want by class ID or class name.
- You can also click on the filter icon and choose the field you would like to filter. Simply click on the filter icon again to clear filter.
4. Trainer Summary:
This area shows all the active Trainers who are attached with your school.
- Color Code: You can hover your mouse over the information icon to see the descriptions:

-
- The first 2 statuses will be applied for Trainer
- The other statuses will be applied for the Trainer forms attached with the Trainer.
- Trainers Compliance Statuses are shown in the following levels:

- Trainer level: show the Trainer name, email and the current Portal status. At the right-side of the tab, you will see some icons:

- Teacher qualification icon: show the new updates of the Trainer compliance forms status related to all classes that the Trainer is attached with
- The Trainer has unverified forms in the classes: Portal will show you a red sign on the icon if the Trainer has any unverified forms in the classes
- Trainer is restricted from assessing for some units: Portal also flag you with a red sign on the icon if the Trainer is restricted from assessing for any units
- Class & course level: The class & course status depends on all the units status. The class & course status will be shown in green as long as all the unit status are green.
- Unit level: The unit status which is shown with the lock icon at the end indicates that the unit is in the unapproved Trainer forms and is locked from assessing.
- Trainer level: show the Trainer name, email and the current Portal status. At the right-side of the tab, you will see some icons:
5. Print Order:

This area allows you to have an overview of the Print Order of your school, view your Order History, as well as add a new Order. You can find further details in this article:
6. IVET Knowledge Base:
In the bottom right corner, there is our Knowledge Base chatbot, where you can view articles on how to interact with our Portal, including:
- Comprehensive Guides: Detailed, step-by-step tutorials to guide you through our Portal features.
- FAQs: Quick answers to the most common questions.
- Troubleshooting Tips: Effective solutions to address issues independently.
- Best Practices: Expert insights to help you get the most out of IVET.