Below is a breakdown of the key actions you can take when managing Credit Transfer (CT) requests. You can click on the link to go directly to the section you wish to view:
I. How to submit a new Credit Transfer (CT) request
II. How to resubmit an unsuccessful CT request
III. How to cancel a CT request
I. How to submit a new Credit Transfer (CT) request
1. Access the Request Credit Transfer Page
- Firstly, navigate to the Trainer Dashboard, then scroll down to locate the class that includes the student applying for CT, and click Go to Class.

- Then click on Class Management

- You will be taken to the Student Progress overview and can click on Request Credit Transfer to start a new request.

2. Create the CT Request
Once you arrive on the Request Credit Transfer page, to prepare the submission:
a. Tick the relevant checkboxes to select the student(s) and unit(s) that you wish to apply the CT to.
b. If you wish to apply a CT for all students for a particular unit, simply tick the checkbox located directly next to the unit name. This will automatically apply the corresponding checkbox for all students in the class for that unit.

c. Once you have finished choosing the units and students, scroll down and follow these steps:
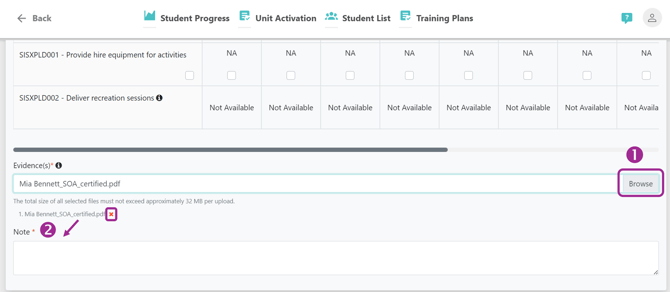
(1) Click Browse to upload the required evidence files (e.g., Statement of Attainment, Record of Results...) that support the CT request.
-
- Note: The total size must not exceed approximately 32MB.
- You can remove an uploaded file using the (x) icon.
(2) Next, a Note is required to explain or clarify details about the request.

(3) Then tick the checkbox as confirmation of the statement "I confirm that..."
(4) Finally, click Submit to finalise the request.

-
- After clicking Submit, the Request CT Submission pop-up window will appear.
- You can review the unit(s) and student(s) selected.
- If all details are correct, click Proceed to finalise the submission.
*Note: If you request a CT for a unit that is in progress, there will be a "REQUEST CREDIT TRANSFER SUBMISSION" pop-up as below

This action will override the student's current progress. Once it is confirmed, click Proceed to finalise the submission.
3. Tracking the status of submitted CT requests
Once you have submitted the request, the system will automatically notify the IVET Admin team, and it will be initially moved into a review queue.
From there, the status of each request will be displayed under the corresponding unit and student, as seen below:

The status types are as follows:
a. Pending - this means the request is currently awaiting the IVET Admin team's review.
b. In Progress - means that IVET's Admin team has started reviewing and processing the request.
After the team has reviewed your request, there are two possible outcomes:
c. CT: The CT request has been approved and successfully processed, no further action is required.
d. Unsuccessful: The CT request has not passed IVET's quality and compliance checks, in which case:
- A Resubmit button will appear underneath the status, allowing you to rectify and resubmit the request.
- You will also be informed by email that the request was unsuccessful and the reason why. Remember to check your spam or junk folder if necessary.

II. How to resubmit an unsuccessful CT request
If the CT request was initially unsuccessful, you can easily revise and resubmit it by following the steps below:
1. Access the Unsuccessful CT Request
- You can access unsuccessful requests by clicking the link provided in the notification email.

- The link will navigate you to the Request Credit Transfer page, where you can click on the Resubmit button showing under the status "Unsuccessful".

2. Update and Resubmit
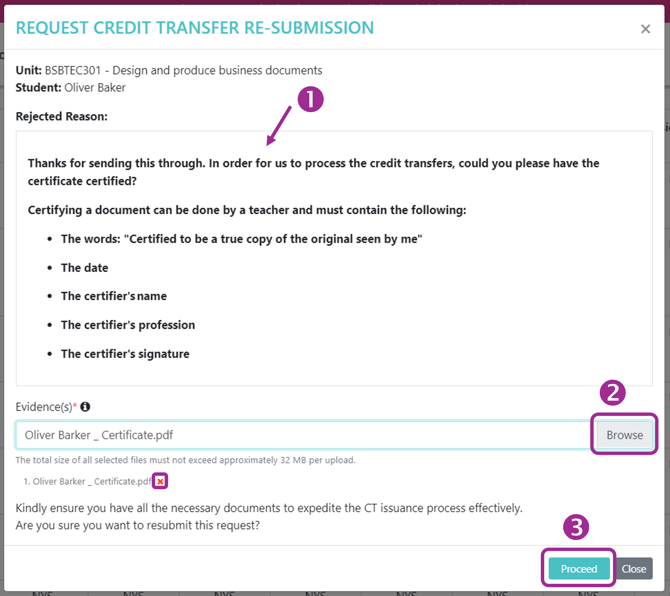
By clicking on "Resubmit", the Request CT re-submission pop-up window appears:
(1) In this box, it will include the reason why the CT request was initially unsuccessful.
(2) Once finished reviewing the reason, you can click "Browse" to re-upload the corrected or additional evidence file(s). Remember, you can also remove a file using the (X) icon.
(3) Finally, click Proceed to resubmit.
Once resubmitted:
- The request status will return to Pending again.
- The IVET Admin team will review the updated submission.
III. How to cancel a CT request
The Portal also allows trainers to cancel pending CT requests.
Note: If the IVET Admin team has started processing a request (in which case the CT status will shown as In Progress), cancellation will not be possible via this page and you will need to contact IVET directly via your SRO or by emailing admin@ivet.edu.au.

1. Cancel a CT request
A Cancel button will only appear when there is at least one Pending or Unsuccessful CT request for the unit.
These steps below guide you through the cancellation process:


*Note: If a unit has more than one pending or unsuccessful request, you can tick the checkbox under the unit to apply the tick to all students:

c. Once all selections have been made, scroll down to the bottom of the page and click Confirm Cancellation.

Note: only click "Confirm Cancellation", ignoring all other buttons.
d. A Cancel pending CT Request pop-up window will then appear.
Review the information carefully to ensure you have selected the right units and students (you wish to cancel the request for), and:
(1) Provide a reason for the cancellation
(2) Finally, click Proceed to complete the cancellation process.

2. After Cancellation
Once the cancellation is successful:
- You will see a message confirming: “Cancelled request successfully.”
- The students' enrolment status for the units will revert to NYS.