Upload Questions require Students to submit their response as a file — such as a PDF, document or image. These questions are marked manually by the Assessor.
To mark an Upload Question, please follow the steps below:
Step 1. Access the Marking Page
- Log in to the IVET Trainer Portal.
- There are 2 ways for you to view and access the to be marked assessments:
(1) Work To Be Marked section: Simply click on Mark Now to go directly to the assessment marking area. The Portal will then bring you directly to the student's submission.

(2) Class Progress section: In the Class Progress section, locate the class you would like to view assessments and click on the Go to Class button:

It will bring you to the Class Dashboard Homepage shown in the image below. In this Homepage, you can go to the marking area either by:
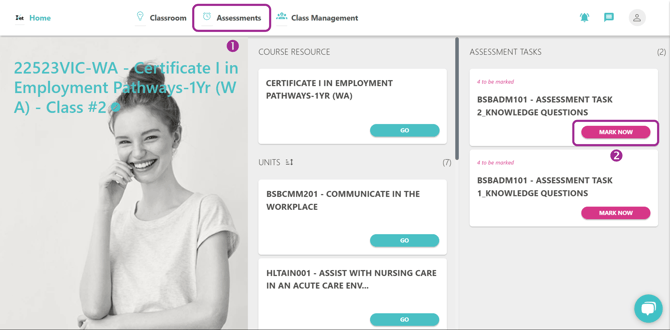
- Clicking the Assessment tab at the top of your Class Management screen
or - Clicking on Mark Now for the assessment you want to complete.
Then the To Be Marked assessments will be shown on your screen, simply click on the Mark button to begin marking.

Step 2: Review the Student’s Uploaded File and Marking Guide
When a Student responds to an Upload Question, all their files will appear within the Student Answer area.

-
Click on the View button on each file to see the student's answers
-
Slightly scroll down to see the marking guide at the bottom
Step 3: Select Marking and Provide Feedback
For Upload Questions, regardless of whether the question is marked Correct or Incorrect, you are required to provide feedback to the student's submission.
3.1/ If the answer is Correct:
When the student's answer is considered Correct, you are required to choose 1 of the 3 options below to provide your feedback:
- Select preset comment: You can select a preset comment from the dropdown:

- Type your feedback: You are able to enter your feedback into the textbox shown on the screen. A set of formatting tools is available to help customise the text to suit your preferences.

- Use the speech-to-text tool:
If you prefer to speak instead of type, you can use the speech-to-text tool:
- Click the Speech to Text button and start speaking
- Click Stop once finished, or wait 10 seconds after you finish speaking for auto-stop
- Review and adjust the generated text if needed
- When using the speech-to-text function in Safari, saying words like “comma” or “full stop” will insert punctuation automatically. We recommend updating to the latest version of macOS and Safari for the best experience.
- Upload additional files: You may upload files (e.g., annotated PDFs or additional resources) into the feedback section to support your comments.

- Record and Upload an audio message:
If you prefer to speak, you may also record and upload audio feedback for the Student:
-
Click on the Record Audio icon, and begin speaking.
- Click on Pause or Resume to pause or resume recording, and click Stop when you’re finished.

- Click the playback button to listen to your recording. You can rename the file by simply clicking its name and typing a new one.
To manage your recording, you are able to: click the Download icon to save the file to your computer, the Tick icon to attach it to your feedback, or the X icon to delete it and record a new one if needed.
-
- PDF annotation tool
If the Student has submitted a PDF file, the Portal allows you to annotate it directly by simply clicking on the View button next to each upload file. You can use the toolbar at the top left corner of the preview window to:
-
-
Highlight the text with colors
-
Add text as a comment or a note, adjust the text color & text size
-
Insert an image from your computer, resize or delete it
If you can not find the Save icon on screen, click on the arrow and you will see it in the options listed.
-

3.2/ If the answer is Incorrect:
You are required to select the appropriate Rectification for the Student's answer before providing feedback.

The rectifications will be marked a,b,c & d as shown in the image below:

- If the Student's answer is considered situation a or b, you can then:
- Choose 1 of the 3 following options to give feedback:
- Select preset comment

- Write feedback on your own: Click here to see details
- Use speech-to-text function: Click here to see details
- Select preset comment
- The Portal allows you to provide additional feedback in some other ways, which is optional:
- Upload additional files: Click here to see details
- Record and Upload an audio message: Click here to see details
- PDF annotation tool: Click here to see details
- Choose 1 of the 3 following options to give feedback:
- If the Student's answer is considered situation c or d, the answer is then considered as & changed to Correct. You can then continue to mark the same process as Correct answer.
These rectifications require further details of the verbal discussion or adjustment explanation in text, so the Select preset comment option will be disabled.
Click here to go back to the Correct answer process
Step 4: Finalise and Submit the Marking
- After reviewing the response and providing your feedback, click Save & Next to go to the next question
- When you're ready, click Submit to complete the marking process.
Once submitted, the Student will be able to access your feedback, including any uploaded files or audio recordings.